According to studies, only 20% of work hours are spent on high-priority tasks. The question that comes up here is: what do the employees do most of the time, and how can their activities be tracked?
In the field of accounting, where every second counts, managing employee time effectively is crucial. Accurate time tracking not only ensures fair compensation but also plays a vital role in optimizing resource allocation and client billing. If your accounting firm uses QuickBooks as its go-to accounting software, you wouldn’t want to revisit the time when manually recording employee time on spreadsheets was the norm. As technology has advanced, your business needs to adapt and embrace tools that simplify processes, reduce errors, and provide real-time insights. Employee time tracking is no exception.
By accurately capturing the time spent on different tasks and projects, your accounting firm can gain valuable data to analyze productivity, identify areas for improvement, and make informed business decisions. If you are wondering how it is possible, the answer is the QuickBooks Time add-on integration.
What is QuickBooks Time, and How Does It Work?
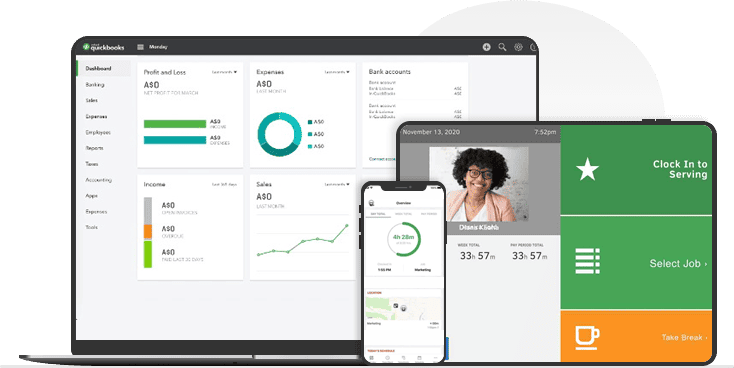
QuickBooks Time is a popular add-on that seamlessly integrates with QuickBooks. It is designed to simplify and automate the process of employee time tracking for accounting firms like yours. Using this add-on, you can replace manual timesheets and benefit from a range of features that streamline the entire time management workflow, such as:
-
Time tracking
Its QuickBooks integration can enable your employees to easily clock in and out using their preferred devices, such as smartphones, tablets, or computers. This flexibility allows them to accurately record their working hours from anywhere, whether they’re in the office, on-site, or working remotely.
-
Real-time synchronization
The data captured is instantly synchronized with your QuickBooks to provide up-to-date and accurate information. This real-time synchronization can eliminate the need for manual data entry and reduce the chances of errors or discrepancies.
-
Project and task tracking
QuickBooks Time also allows your employees to allocate their time to specific projects or tasks. This feature can help your accounting firm monitor the time spent on different projects and assess project profitability. It also provides insights into resource allocation and helps you identify areas where efficiency can be improved.
-
Labor cost calculation
After successful QuickBooks integration, this add-on automatically calculates labor costs based on employee hours and pay rates. This feature simplifies the payroll process and ensures accurate compensation for employees. It also provides you with valuable data for financial reporting and budgeting purposes.
-
Advanced features
QuickBooks Time offers additional advanced features to enhance time management for accounting firms. These include employee scheduling, geofencing (defining virtual boundaries for tracking work locations), and paid time off (PTO) management. These features allow for better workforce management, efficient scheduling of tasks, and effective monitoring of attendance and leaves.
How to Integrate QuickBooks Time with QB Desktop Software?
Before you reach the integration steps, ensure the following:
-
Check QuickBooks preferences
In QuickBooks Desktop, make sure you have turned on the Full Payroll preferences. Also, match the week start date in both QuickBooks and this add-on. Additionally, check ‘Use time data to create paychecks’ in both the company-wide preferences and for each active employee. Remember to set up each employee with at least one payroll item.
-
Manage user access and permissions
Ensure you have access as the main administrator and the ability to switch to single user mode in QuickBooks Desktop. This access is necessary to perform the integration. Additionally, you need to add all users whose time is to be exported to QuickBooks as employees.
-
Use the same computer for integration
Perform this QuickBooks integration on the computer where you plan to sync QuickBooks Time and QuickBooks desktop since the sync can only be done in one location.
Here are the steps you need to follow for QuickBooks Time – QuickBooks Integration:
- Launch QuickBooks Desktop and sign in as the main administrator in single user mode.
- Install the QuickBooks Time add-on.
- In QuickBooks Time, locate ‘QuickBooks Desktop Integration’ in the list and select Install.
- Make your selections for the information you want to bring over from QuickBooks to QuickBooks Time. This includes options like deleting all users, importing customers and jobs, showing service items, billable time, and class tracking. Choose the required option and click Next.
- If you had set up jobs or customers in QuickBooks Time before the integration, there will be a warning about them being removed during the sync. Read the warning before you select Continue.
- Select Advanced/Manual Setup and click the provided blue web connector link. Open the downloaded file and confirm any security prompts.
- In the QuickBooks Time Set Up Web Connector window, note the 4-digit password. Enter the password in the Web Connector window and save it. Then, choose Update Selected.
- After the sync completes, follow any remaining instructions or prompts in QuickBooks Time to finalize the integration.
By following these simplified steps, you’ll be able to integrate QuickBooks Time with QuickBooks Desktop seamlessly.
QuickBooks Time Integration With QB Hosted On the Cloud – Is It Possible?
If you decide to host QuickBooks on the cloud, it is still possible to integrate QuickBooks Time even when the latter is hosted on third-party cloud servers. The integration process remains largely the same; however, there are a few additional considerations to keep in mind, such as:
- When using third-party cloud servers for hosting QuickBooks Desktop, you’ll need to ensure that the necessary network and security configurations are in place to allow communication between QuickBooks Time and the hosted QuickBooks Desktop.
- Also, check if the version of QuickBooks desktop you are using is compatible with QuickBooks Time. Ensure that the system requirements for both applications are met.
If you don’t have a QuickBooks Time account, sign up for one on the QuickBooks Time website and provide the required information to create your account. Then you can work with a renowned third-party QuickBooks cloud hosting provider to ensure that the necessary ports and network configurations are set up to allow communication between QuickBooks Time and the hosted QuickBooks Desktop. This may involve configuring firewall settings, network routing, or VPN connections.
Once the integration is successful, you are advised to initiate the initial sync between QuickBooks Time and the hosted QuickBooks desktop. This way, you can verify that the data is accurately transferred between the two systems.
Irrespective of your decision to use QuickBooks desktop on an on-premise infrastructure or in the cloud, QuickBooks Time can help you unlock the full potential of employee time tracking in your accounting firm.
Be the first to comment on "How to Integrate QuickBooks Time with QuickBooks"